War Thunder has over 1,700 vehicles to choose from. With all of these different choices, you’re going to want to stand out on the battlefield, not just with your skills but with your skins as well. The best way to do this is by installing a custom skin.
Recommended Videos
Downloading a custom skin
- Head to live.warthunder.com and click on the Camouflages tab
- Type in the vehicle that you want to customize in the search bar
- Download the file (you may have to decompress if it is a .zip file)
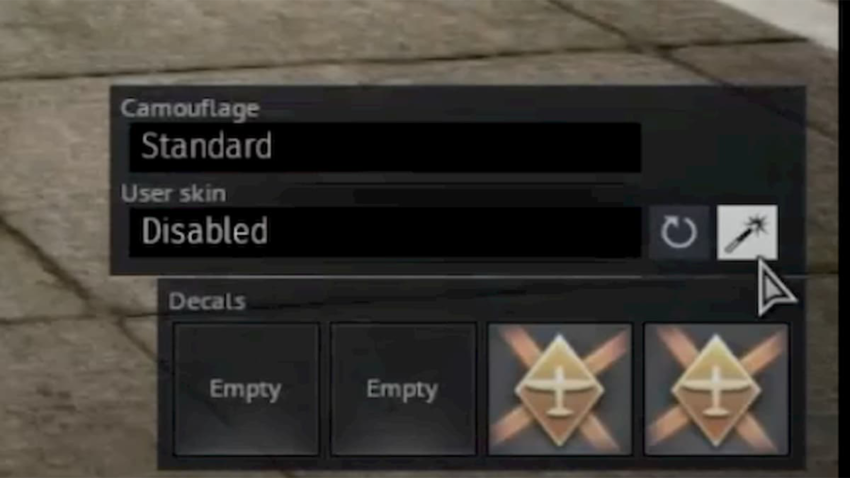
Installing a custom skin
- In-game, click on the customization options for your chosen vehicle
- Click the wand tool labeled “Create a user skin sample files in the game folder”
- Go to your War Thunder folder: Local Disk (C:) > Program Files (x86) > Steam > steamapps > Common > War Thunder
- Once in the War Thunder folder, go to the User Skins folder and find the template for the vehicle you want to re-skin
- Copy and paste all of the skin files from the folder you downloaded and be sure to click “replace files in destination”
- In the “User skin” drop-down menu, change the skin from Disabled to the new skin template
Now when you click on the template in game you will see your custom skin. Keep in mind this method is available for all types of vehicles and you can add as many skins as you want.
Gamepur is supported by our audience. When you purchase through links on our site, we may earn a small affiliate commission. Learn more about our Affiliate Policy


Published: Sep 21, 2020 09:03 am