The Steam Deck is an incredibly versatile piece of hardware, able to play thousands of PC games in the palm of your hand and many others through emulation or with a bit of tweaking. Its desktop mode lets you use it as a Linux or Windows-based PC. However, one of the Steam Deck’s few weaknesses is how clunky the on-screen keyboard is to use. Thankfully, there are two simple ways to set up a keyboard and mouse to work on the Deck, sidestepping the issue altogether. Here’s how to do it.
Related: Best games to play on Steam Deck
Use a USB Hub or the Official Steam Deck Dock
Before the recent launch of the official Steam Deck Dock, your best bet for directly connecting a keyboard and mouse to your Deck was through a USB hub. You can find all kinds of these on Amazon, Newegg, and other technology retailers, and integrating them into your setup is easy. Simply connect all your cabled devices — keyboard, mouse, Ethernet, even HDMI and DisplayPort — to the hub, then use the hub’s USB-C cord to connect it to the Deck.
If you’ve set up everything correctly, which is to say, everything is plugged in; you should have no trouble using your connected devices in Desktop mode. This process should work for both wired and wireless devices. The main limitation is you’ll need a second keyboard/mouse combo if you want to use your Deck alongside a standard PC setup.
The Steam Deck Dock follows the same rules described above, and though Valve built it specifically for the Deck, it’s usable as a standard hub, even if it is a little awkward.
Using Barrier for Steam Deck

Barrier is a handy piece of software that allows you to seamlessly use one keyboard and mouse for your Steam Deck and main PC. Setting it up can be a little finicky, but it works like a dream once configured.
Start by going to the Barrier GitHub page and downloading the app to your computer. On your Deck, load Desktop mode and find Barrier in the Discovery app store. Once you have Barrier installed on your PC and your Deck, open both. Install Bonjour when prompted, and be sure to stop Barrier from running (noted at the bottom right of the menu). Do this for both instances.
With Barrier launched on both systems, look at the app. Your main PC with the keyboard and mouse connected will need to be the Server, the top menu option within Barrier. Take note of the IP address listed within the app. You’ll need it in a moment. Make sure you have “Configure interactively” selected, then go into the Configure Server menu.

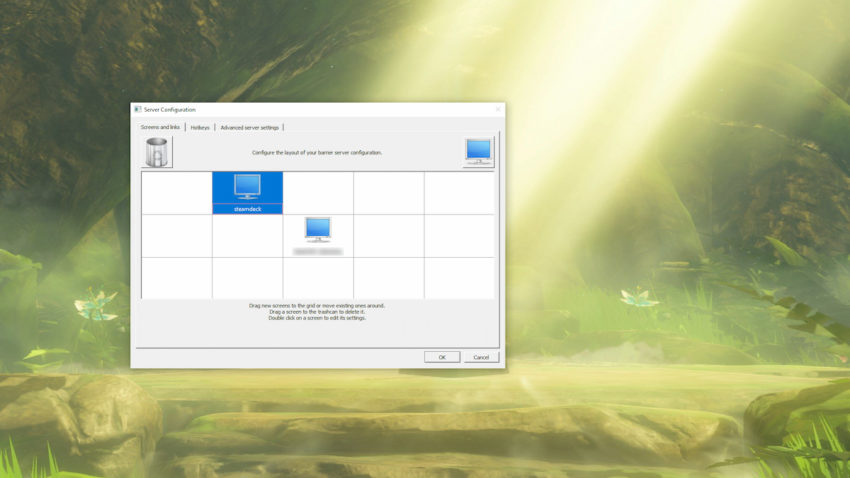
Click and drag the monitor image at the top right of the menu down onto the grid based on where the Deck will be compared to your PC. If your Deck will be above and to the left of the main computer, place the monitor symbol in the top left section of the grid with your Desktop in the center. Rename the new icon to “steamdeck,” your Deck’s default device name within Barrier.
Next, go to the Barrier dropdown menu in the top right of the app and select Change Settings. You can leave everything on this screen alone except for one little button: Enable SSL. In all our testing, disabling this option on both your main PC and the Steam Deck makes everything easier.

Now it’s time to configure the Deck side of Barrier. In Desktop mode with Barrier open, select the Client check box, then deselect Auto config. Enter the IP address shown on your PC’s version of Barrier, then go into Change Settings on the Deck and deselect Enable SSL again. You’ll need to do both steps each time you launch Barrier.
Once everything is set up, run Barrier on your PC, then your Steam Deck. Everything is working if you can take your PC’s mouse off your primary monitor and onto your Deck’s Desktop. The transition is based on where you placed your Deck in the Configure Server screen, so if your Deck is above the PC, the transition will be at the top of your monitor.


Published: Oct 9, 2022 06:04 pm